Lab 4 A, B, I, J
DNA Inquiry
Purpose
Our goal was to learn to make the solutions necessary for DNA analysis and use them to separate DNA from a solution.
Materials
analytical balance
Sodium hydroxide
glass rods
beakers, 50 mL
DNA, salmon testes
pipet, 2 mL
pipet pump, blue
micropipet, P-1000
mircopipet tips
Ethanol, 95%
glass rods
tube racks for 15 mL tubes
permanent lab marker pens
plastic beaker, 1L
TAE buffer concentrate, 40X
beakers, 600 mL
balance, tabletop milligram
weigh paper
weigh boat
lab scoops
sodium chloride
tubes 15 mL
tube racks for 15 mL tubes
TRIS
EDTA, disodium salt
agarose
media bottle, 250 mL
permenent lab marker
glaases, saftey
gel box, horizontal, for agarose gels
beakers, 50 mL
tube rack for 1.7mL tubes
DNA samples
micropipet, P-10
prepared aragose gels
reaction tubes,1.7 mL
yeast DNA
micropipet, P-100
TAE buffer concentrate, 40X
permanent lab marker pens
gel loading dye, 10X
micro[pipet tips for p-10bottle, 125 mL
graduated cylinder, 100 mL
pH paper
Hydrochloric acid
Procedure
Lab 4a
Part I: Preparing 5M of NaCL
1. Use molarity formula. Need 2.92 grams of NaCl in conical tube.
2. Add 10 ml of water to tube w/ NaCl
3. Vortex and label. Store (will be used later)
Part II
1. Add 0.157 grams TRIS and 0.037 grams of EDTA to beaker.
2. Add 80 ml of water to mixture.
3. Add HCI to the solution until the pH level is between 7.5 and 8.5.
4. Add water until the solution is at 100 ml.
5. Label and store
Lab 4b
1. Put 1 mL Salmon Sperm DNA and 1 mL TE into a beaker
2. Add 5M NaCl to the beaker
3. Add 4 mL ETOH to beaker. Do Not mix.
4. Use a glass stir rod and spool out the DNA
5. Place the spooled DNA into a conical tube and add 2 mL TE
Lab 4i
1. Add 0.4g agarose powder and TAE to 100 mL beaker
2. Heat solution until agarose dissolves
3. Let solution cool and then pour it into the gel box w/combs and let harden (should become translucent)
Lab 4j
1. Cover the gel in TAE
2. Add 20 uL DNA and 4 mL of 6x loading dye into a tube
3. Using a micropipet, load the solution into the gel
4. Apply electric charge to gel for approximately 45 minutes
5. Stain the gel with Ethidium Bromide
6 Rinse off and observe
Data/ Results
Here's the short answer: none.
After staining the gels and rinsing them, we discovered that not a single gel out of the two classes had actually worked. Not surprisingly, not a single group out of the two classes was thrilled...How unfortunate. Immediately afterward, we began brainstorming ways that our experiments could have gone wrong.
What could have gone wrong?
1. Staining overnight caused the DNA to diffuse out of gel. Unlikely due to DNA's size.
2. Denatured DNA. Doubtful- that's why we have the stain.
3. Did not load the DNA properly. Possible, but not likely, as every single group would have to have done it wrong.
4. The stain went bad. Probably, the stain is light-sensitive and was being used since last year.
5. Dye not resuspended before loading. Unlikely- again, everyone would have to have done it wrong.
Reflection
Normally at this point I would say how well our group worked together, but in this case, that would apply to an ever-increasing congregation of labmates. That is not to say that we weren't effective. Due to a shortage of materials and organization, what started off as a three person group grew to about 6 or 7 people. This was not a problem, as each of us had materials that others didn't (my original TE buffer concentration was slightly off, so we ended up using a solution from one of the added groups). Sometimes organization was lacking, but this did not cause any major issues and we completed the lab without problems (except for it not working the first time).
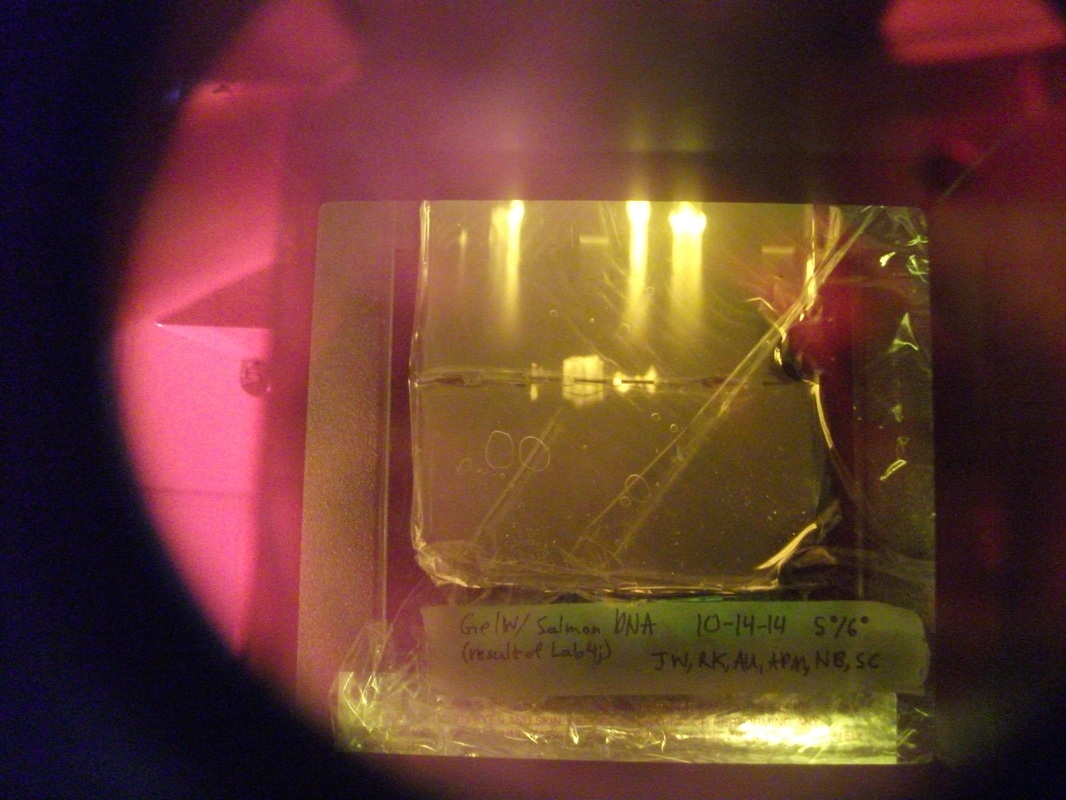
(some time later) By using a new stain, we were able to finally get the results we were looking for (or at least see them).
Our goal was to learn to make the solutions necessary for DNA analysis and use them to separate DNA from a solution.
Materials
analytical balance
Sodium hydroxide
glass rods
beakers, 50 mL
DNA, salmon testes
pipet, 2 mL
pipet pump, blue
micropipet, P-1000
mircopipet tips
Ethanol, 95%
glass rods
tube racks for 15 mL tubes
permanent lab marker pens
plastic beaker, 1L
TAE buffer concentrate, 40X
beakers, 600 mL
balance, tabletop milligram
weigh paper
weigh boat
lab scoops
sodium chloride
tubes 15 mL
tube racks for 15 mL tubes
TRIS
EDTA, disodium salt
agarose
media bottle, 250 mL
permenent lab marker
glaases, saftey
gel box, horizontal, for agarose gels
beakers, 50 mL
tube rack for 1.7mL tubes
DNA samples
micropipet, P-10
prepared aragose gels
reaction tubes,1.7 mL
yeast DNA
micropipet, P-100
TAE buffer concentrate, 40X
permanent lab marker pens
gel loading dye, 10X
micro[pipet tips for p-10bottle, 125 mL
graduated cylinder, 100 mL
pH paper
Hydrochloric acid
Procedure
Lab 4a
Part I: Preparing 5M of NaCL
1. Use molarity formula. Need 2.92 grams of NaCl in conical tube.
2. Add 10 ml of water to tube w/ NaCl
3. Vortex and label. Store (will be used later)
Part II
1. Add 0.157 grams TRIS and 0.037 grams of EDTA to beaker.
2. Add 80 ml of water to mixture.
3. Add HCI to the solution until the pH level is between 7.5 and 8.5.
4. Add water until the solution is at 100 ml.
5. Label and store
Lab 4b
1. Put 1 mL Salmon Sperm DNA and 1 mL TE into a beaker
2. Add 5M NaCl to the beaker
3. Add 4 mL ETOH to beaker. Do Not mix.
4. Use a glass stir rod and spool out the DNA
5. Place the spooled DNA into a conical tube and add 2 mL TE
Lab 4i
1. Add 0.4g agarose powder and TAE to 100 mL beaker
2. Heat solution until agarose dissolves
3. Let solution cool and then pour it into the gel box w/combs and let harden (should become translucent)
Lab 4j
1. Cover the gel in TAE
2. Add 20 uL DNA and 4 mL of 6x loading dye into a tube
3. Using a micropipet, load the solution into the gel
4. Apply electric charge to gel for approximately 45 minutes
5. Stain the gel with Ethidium Bromide
6 Rinse off and observe
Data/ Results
Here's the short answer: none.
After staining the gels and rinsing them, we discovered that not a single gel out of the two classes had actually worked. Not surprisingly, not a single group out of the two classes was thrilled...How unfortunate. Immediately afterward, we began brainstorming ways that our experiments could have gone wrong.
What could have gone wrong?
1. Staining overnight caused the DNA to diffuse out of gel. Unlikely due to DNA's size.
2. Denatured DNA. Doubtful- that's why we have the stain.
3. Did not load the DNA properly. Possible, but not likely, as every single group would have to have done it wrong.
4. The stain went bad. Probably, the stain is light-sensitive and was being used since last year.
5. Dye not resuspended before loading. Unlikely- again, everyone would have to have done it wrong.
Reflection
Normally at this point I would say how well our group worked together, but in this case, that would apply to an ever-increasing congregation of labmates. That is not to say that we weren't effective. Due to a shortage of materials and organization, what started off as a three person group grew to about 6 or 7 people. This was not a problem, as each of us had materials that others didn't (my original TE buffer concentration was slightly off, so we ended up using a solution from one of the added groups). Sometimes organization was lacking, but this did not cause any major issues and we completed the lab without problems (except for it not working the first time).
(some time later) By using a new stain, we were able to finally get the results we were looking for (or at least see them).